So much about putting instruction today is about teaching golfers “a better stroke”. While technical fundamentals are important, my belief is that I have to help my students learn to make more putts! Certainly, I want to work with their skill development in putting, defining their movement patterns and agree with them on compatibility. Then it boils down to consistency…what can one do in the four basic skill areas of putting: Speed, Read, Aim, and Line.

The bottom line is delivering the ball with a consistent speed into the hole. Consistency should have a higher priority than putting style. Research shows that the best putters don’t necessarily have the best technique, but have very consistent movement patterns. Most definitely, I do not have a specific technique that I subscribe to. This is why putting sessions tend to very enjoyable for me as an instructor because you see so many different styles that work.
Putting is both science and art. My belief is that you also cannot discount both belief and intuition as part of the successful putter. And…touch and feel can be learned! It is about matching up green speed and delivery speed!
With this being said, I get a lot of questions about putting. This encouraged me to share some thoughts and considerations on putting. Maybe something will speak to you and your putting will be enhanced. You’ll find a little bit of everything, which is my intent, but please do not leave without learning about the Fall Line and the SPIDER! My sense is that this information alone could help so many golfers…understanding gravity from the surface axis tilt and the fall line…HUGE!
Reading a Putt vs. Reading a Green
- Reading greens is “forecasting” what the ball will do based on green shape, hole location, green speed, slope direction and slope percentage.
- Reading putts is making a “decision” on where to aim and start the ball along a pre-selected line based on matching the skills of speed and read.
In reading putts, the green surface that matters is the surface the ball will roll over from its resting place into the cup. So there is a big difference in reading the green and reading the putt. Reading the green gets you started on accurately reading the putt. The most important part of any putt is the last two or three feet …it is supposed to be reasonably flat and not too tilted. Learning how breaking putts from any direction must cross the 3-foot disk around the hole into the hole is mostly knowing how to see the SPIDER…below.
Arc vs. Straight Stroke
My belief is that all putting strokes are arcs in 3-dimensional space and straight back/straight through in 2-dimensional space. One needs to look at the path and rise angle…are they compatible? Is it clubface rotation or true arc putting? Where is the face at address, the face at impact, and the face during the motion? Is it better to change the aim or the path?
Research shows that so few golfers start the ball perfectly on-line, have the face perfectly square or have the perfect path direction every time. Whatever you do, just do this consistently.

Aim Challenges
Most golfers have difficulty with aim. This could be one or more of many differing things: perception of the target location, awareness of self in 3-dimensional space, putter orientation to target, self-orientation to the putter, putter design, and putter fitting. There is both static aim and dynamic aim…the brain/body connection really comes out here when you see a golfer aimed one way statically and this drastically changes dynamically.
Learning to use the line on your putter more like a compass vs. a protractor might bring the dynamic aim and static aim together, especially since it is not exact. If your putter is fitted to you, knowing your tendencies of aim might help with mapping out the play of the hole from tee to green!
Physical factors that could influence aim:
Your Putts are Finishing Left of the hole (right-handers)
- ball too far forward
- club rotation in a counter-clockwise direction
- shaft leaning backward
- shaft angle lowered
- body alignment too far left
- putter design where it appears “open” when it is “square”
Your Putts are Finishing Right of the Hole (right-handers)
- ball too far back
- club rotation in a clockwise direction
- shaft leaning forward
- shaft angle raised
- body alignment too far right
- putter design where it appears “closed” when it is “square”
Putting Green Shapes
Understand the shape and find the hole! A ski slope is not linear…there is a high and a low…find the lodge!
- Planar: tilted and flat
- Crown: high and two lows
- Saddle: two highs and a low
The Fall Line and The SPIDER
The ‘fall line’ of the green surface at the cup runs straight uphill-downhill through the center of the cup. Finding this “net straight” high to low line can begin your understanding of the spider…the right side of this line will indicate a right to left curvature and the left side will indicate a left to right curvature. The degree of tilt will help visualize how much curvature heading towards the 3-foot disk around the cup with the hole in the center. The final path of all putts across the flat but tilted surface right around the hole makes a pattern like a spider with the legs all indicating different pathways into the hole…the “curves” are a series of tangent lines to the fall line. The head of the spider is the aim spot. Learning how slope tilt, green speed, and distance of putt make the spider change size can help you visualize the curve or path of the one ‘leg’ of your putt.
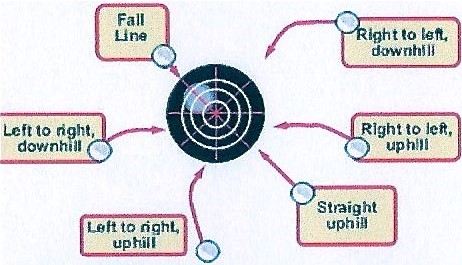
To see the “spider”, you need to be able to visualize what would happen if you putted straight at the hole along the axis of tilt of the 3-foot disk that is perpendicular to the “fall line” and is the line along which the elevation of the green stays constant. You can find the axis of tilt after you find the fall line. Stand below the cup looking up at the highest point on the lip. Next check to see if the perpendicular line through this sense of fall line is actually the axis of tilt. When you have both of these identified, you can sense the aim spot or the ‘head” of the spider. To do this, go away from the hole along the axis of tilt the same length as your real putt. From this distance, imagine putting straight at the hole along the axis with good speed as if the putt were straight and level. The ball will curve off this line right from the start and by the time is crosses the fall line on the low side of the hole, it will have reached the maximum break for that speed. How far below the hole the ball crosses the fall line indicates the break due to gravity relative to the tilt of the surface.
All you need to do is to locate the aim spot (head of the spider) uphill along the fall line and equal distance. If you putt from the same distance out along the axis of tilt directly at this aim point with the same speed as if the putt was straight and level, the ball will curl down into the hole. This is what we mean when we say every putt is a straight putt!
Training To Help With Fall Line And Spider
A carpenter’s level is a great tool to determine the high and low point so that you can identify the fall line. Then you can experiment with golf balls arranged to the right and left of this fall line to help determine the axis of tilt. Putting from a variety of distances and watching each ball roll out so that you can do some math about the aim spot/spider’s head. Seeing this success will help you trust putting straight to the aim point when you might be sensing otherwise. Rolling golf balls with your hand is also a great way to learn about reading putts too!
Bottom line? Have a confident, consistent, and reliable pre-shot routine that puts you into a good state for putting…distance and direction. Circle the wagon, feel the ridgeline and find the fall line. Then, read it, roll it, and HOLE IT!
Deb


