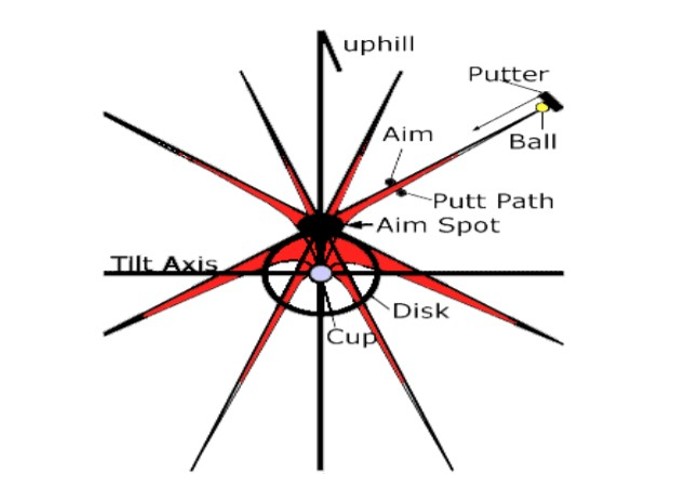
The “fall line” of the green surface at the cup runs straight uphill-downhill through the center of the cup. Finding this “net straight” high to low line can begin your understanding of the spider… the right side of this line will indicate a right to left curve and the left side will indicate a left to right curve.
The degree of tilt will help visualize how much curvature heading towards the 3 foot disk around the cup with the hole in the center.
The final path of all putts across the flat but tilted surface right around the hole makes a pattern like a spider with the legs all indicating different pathways into the hole … the “curves” are a series of tangent lines to the fall line. The head of the spider is the aim spot. Learning how slope tilt, green speed, and distance of putt make the spider change size can help you visualize the curve or path of the one “leg”
of your putt.
To see the “spider”, you need to be able to visualize what would happen if you putted straight at the hole along the axis of tilt of the 3 foot disk that is perpendicular to the “fall line” and is the line along which the elevation of the green stays constant. You can find the axis of tilt after you find the fall line. Stand below the cup looking up at the highest point on the lip.
Next check to see if the perpendicular line through this sense of fall line is actually the axis of tilt. When you have both of these identified, you can sense the aim spot or the ‘head” of the spider. To do this, go away from the hole along the axis of tilt the same length as your real putt. From this distance, imagine putting straight at the hole along the axis with good speed as if the putt were straight and level. The ball will curve off this line right from the start and by the time is crosses the fall line on the low side of the hole, it will have reached the maximum break for that speed. How far below the hole the ball crosses the fall line indicates the break due to gravity relative to the tilt of the surface.

All you need to do is to locate the aim spot (head of the spider) uphill along the fall line and equal distance. If you putt from the same distance out along the axis of tilt directly at this aim point with the same speed as if the putt was straight and level, the ball will curl down into the hole. This is what we mean when we say every putt is a straight
putt!

Training to Help You See the Fall Line and the Spider
A carpenter’s “level” is a great tool to determine the high and low point so that you can identify the fall line. Then you can experiment with golf balls arranged to the right and left of this fall line to help determine the axis of tilt. Putting from a variety of distances and WATCHING EACH BALL ROLL OUT so that you can do some math about the aim spot/spider’s head. Seeing this success will help you trust putting straight to the aim point when you might be sensing otherwise. Rolling golf balls with your hand is also a great way to learn about reading putts too!
Bottom line? Have a confident, consistent, and reliable pre-shot routine that puts you into a good state for putting…distance and direction. Circle the wagon, feel the ridgeline,and find the fall line. Then, read it, roll it, and hole it!
Read Part 1 of Deb’s 2022 Putting Series – Make More Putts – Reading, Aim, and Stroke
Feature Photo: Jennifer Chang at the 2021 Dow Great Lakes Bay Invitational by Ben Harpring


